A reader asked me how to frame liberated roses
without having lots of long straight edges, like below.
My suggestion is using your rotary cutter
and some curved machine piecing.
1. Cut 4 to 5 inch wide background strips in green
2. With your rotary cutter, cut your rose into a curved shape.
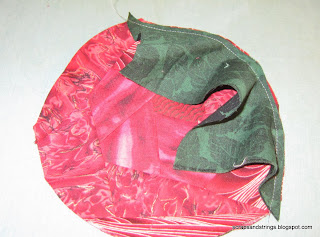
3. Lay your wide strip underneath one side of the rose and cut along the line of the rose.
4. Mark the starting point on the rose, pin and sew, using a shallow seam allowance.
5. Press seam, and then repeat for the opposite side.
6. Lay another background strip on the top and cut curve where necessary.
6. Sew and press. In this case, the last side only needs a straight strip sewn on it.
7. Sew, press, and square up to preferred size.
Here's two rose blocks.
And since a bunch looks better, here's a third.
8. I decided to join the blocks into a small bouquet, so I repeated the steps.
I laid the lighter green block underneath the darker block
and cut a gentle curve where the two overlapped.
9. Here they are sewn and pressed.
10. then lay the third rose on top of the joined blocks and cut around it.
11. pin, sew, and press
12. Lay another strip of background fabric underneath, and cut along the curve of the rose
and extend the curve to the edge, as below.
Here it is sewn together.
13. repeat for remaining gap. mark and pin where necessary.
14. Sew, press, and square up. I know my greens contrast with each other
and I'd suggest using background colours in the same value.
Any questions? email me at strings[at]mts[dot] net or leave a comment below.


.JPG)


.jpg)


9 comments:
Brenda, THANK YOU for showing this to me. I'm going to have a go at it. It all makes sense. Now let's see what happens when I get that rotary cutter in my hands!
Thanks Brenda. I've bookmarked it and added it to the tutorials on Lib-Quilters.
great information....another one for the idea file!
You make it look so easy - thanks for sharing.
TERRIFIC tutorial - thank you!!!!
Great tutorial. Thank you for sharing your ideas.
Your roses look so much better than my roses. (am I too critical) Maybe so. But yours look awesome. Mine just look stupid! LOL.
Thanks for the tutorial on putting this together.
glen
Terrific tutorial you shared here. It is easy to understand and can 't wait to make one before Christmas. I truly saying that it is truly interesting.
courses en ligne
Brilliant! I love the roses, but I've never made any. Also, I appreciate the detail on how to get the curves to match - haven't realized it's that simple. THANKS!
Post a Comment