

into something like this:

My bag full of silk noile and China silk scraps comes from my garment sewing days BC (before children). A bunch of years back, after my sister announced her engagement, I started sewing my outfit for her wedding from jewel toned silk noile, resulting in this:

I spent months cutting the pieces and sewing them onto a foundation for the jacket body. (the back is pieced too.) I ran out of steam on the sleeves and just put a patchwork band on it. The dress underneath is black silk noile, with long sleeves. I can't think why I didn't make it sleeveless, except that it was a January wedding and it was cold.
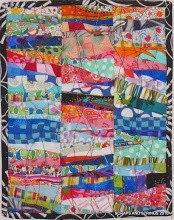
I still have lots of scraps from that project, including a few more in red silk noile, so three years ago I made the little string quilt. I used a foundation piecing technique inspired by a Threads magazine article (which I can't find right now) and all the chinese coin quilts I saw on the web that summer. I also recall being inspired by Gwen Marston's Liberated String Quilts which I purchased that summer.
Step 1. Cut some foundations in muslin if you're machine quilting, or paper if you're hand quilting:


Step 2. Cut some strips from your scraps. Mine are 1.5 to 2 inches at the widest. The key to this method in getting the curves in the strip is to cut them wedge like, so there's some bias along the edges, like this:

Step 3:
Start sewing the strips on the foundation. I start with a wide black one at the end, and layered the green wedge on top, pulling slightly on the bias side so the strip curves like this:


Keep adding strips in this flip-and-sew method until the foundation is covered.


 I angled the seam off to a point on the green strip, trimmed the excess fabric in the seam allowance, and then covered that with a wide black strip. I'm only using two colours here, since I have a limited pallette. This method also works with cotton, but this loose weave in the silk noile makes lovely curves.
Here's a finished block:

Step 4. Make as many blocks are you like, and then trim to size:


Step 5: remove paper foundations and use the blocks in your quilt.
Questions? email me at strings[at]mts[dot]net


.JPG)


.jpg)


5 comments:
The colours are just gorgeous.
YOu've got my juices flowing.
What lovely blocks, silk is so pretty
Brenda, you remembered, and so quickly, too! Thanks so very much! I'm going to get to work on it this weekend. Love your jacket, too!
Thanks for this tutorial. The blocks look wonderful. I have lots of silk scraps and want to try this.
Wow, these curved strings are great! I've never worked with silk so I don't know in what ways it's different from cotton. Do you think this method would work with cottons?
Post a Comment